Acknowledgments
I am indebted to Clive Elsmore (blog: http://cliveinsrilanka.blogspot.com, twitter: @CliveSir) for suggesting that the topic of this post might be of interest to other Reform Symposium presenters.
It is to do with creating video files that are suitable for using in virtual presentations of any sort, though the focus of this post will be the Reform Symposium itself.
It covers not just the technical aspects of creating and uploading videos, but also planning how to use videos in your presentations.
Planning
Video clips work best if they are less than two minutes long: a video lasting 20 minutes is likely to see your audience wandering off to somewhere else on the Internet.
Video clips are also better if they are spread out throughout your presentation. Again, five clips clips presented one after the other risks losing your audience.
As always, the two recommendations above are exactly that: they are recommendations only. There may be circumstances where a longer video clip is not just useful, but may indeed be essential to your presentation.
Video editing is something of a specialist task, and beyond the scope of this post. Ubuntu users might want to use Kino (free, use Synaptic to “get” it), while Windows users might want to use Windows Live Movie Maker (free) or AVS Video Editor (US $60).
It is better to upload videos at least 30 minutes before your session starts. That way, downloads onto attendees’ computers can start as soon as they join your session.
Preparing Your Videos
An Apology In Advance
I will apologise in advance for using numbers in this post. I know that some people are terrified by them. Unfortunately, when it comes to preparing your videos, there is simply no way around using numbers.
Total Size of Your Video Clips
The aggregate size of your video clips should not exceed 10 MB. Video clips not exceeding 2 MB work best.
The reason for this is that not everybody has a broadband connection, and even if they do local conditions may degrade their Internet connection to dial-up speeds.
File Format of Your Video Clips
Videos can be stored in a number of different “file formats”. The most commonly supported ones are MPEG4 (also known as mp4) and Flash (also known as flv). Elluminate supports both of these. For other virtual platforms, it is worthwhile checking that the file format that you are thinking of using is supported by that platform.
Frame Size
The size of an frame is indicated how many “pixels” there are across and down. These pixels are the same thing that your computer monitor is measured in. Common examples are 1366×768, 1600×900 and 1920×1080.
The frame size of a video clip has a major impact on the size of the video file. For example, by shrinking a frame from 1280×720 to 640×360, or halving both the width and the height, reduces the size of the file by 75%.
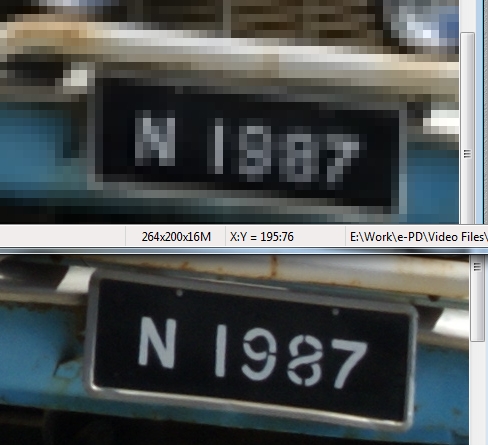
The frame size should be as small as possible, but no smaller than can be both seen easily on a computer and also show important detail. This image, for example,
shows where the number plate is no longer easily readable. This was using a factor of one-eighth, rather than the factor of a half mentioned earlier.
Bit Rate
Video information is delivered using an encoded stream of bits, and this comes at a fixed speed known as a “bit rate”. Every file format includes information about the bit rate of the video content. Higher bit rates produce better quality images.
There is an interaction between bit rate and frame size. Smaller frames need lower bit rates. If you keep the same size of frame, but reduce the bit rate, the image will become burred. The more the bit rate is reduced, the more the image will become blurred.
Depending very much on the size of the frame, a rough guide is that 1,000 kbps is usually okay, but 100 kbps may be unusable. Bit rates of 5,000 kbps and above are good for high quality video.
It is worthwhile experimenting the bit rate and the frame to achieve what you regard as an optimum result – there are no “hard and fast rules” on this matter.
Conversion Tools
There are many conversion tools that you can use to adjust the frame size and bit rate of a video file. My own experience is that VLC Media Player is the best by far. It is also free, and is available for Windows, Linux and Mac.
It allows you to adjust the frame size and the bit rate. It has the added bonus that it can also convert from uncommon file formats into both MPEG4 and Flash.
There is a wiki which is useful, and can be accessed by “Help… Help…” in the menu bar.
For people who wish to experiment without reading the manual, I suggest using “Media… Convert / Save …” and then following the prompts.
The Edublogs/Elluminate session at 23:00 UTC 28 July will include an application share so that people can see it demonstrated.
Finally …
I hope that the foregoing is useful for people wanting to prepare for #rscon3. If you have any questions or comments, please use the comment facility below; you never know, somebody else may have a similar question!
