Acknowledgment
My thanks go to Shelly Terrell (Twitter: @ShellTerrell, blog http://www.shellyterrell.com/about.html) whose tweet “When coding meets art” inspired this post.
Background
I guess most people are familiar with the tools used by painters and other artists: crayons, pencils, brushes, water colours, acrylic, oils and other materials. Computers have become increasingly involved in image creation for both static pictures and movies, as well as computer-based games. With the dramatic fall of the price of computers as well as their ever increasing graphics capability, the young children of today can exploit these devices for their own artistic creations. For children interested in coding, they can also use coding as part of their creative work. This post is a reflection of my own use of coding for some of my own artistic work.
The Artist’s Goals
I remember using paints and a brush at primary school. My interests moved away from painting, and moved (eventually) into computers. I had no inclination to pick up a paint brush as a young adult, the reason being my inability to achieve the sort of quality of artistry, perfectionism if you like, that I would have demanded of myself. The advent of computers has overcome that barrier.
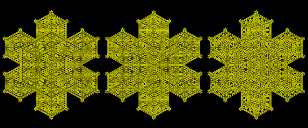
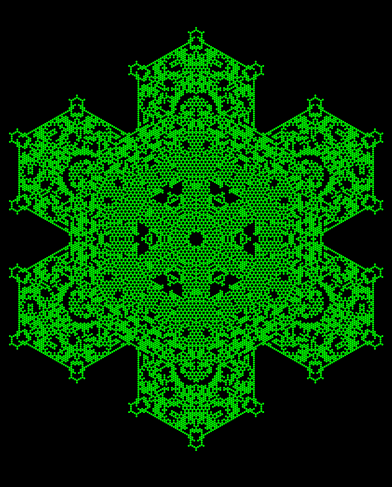
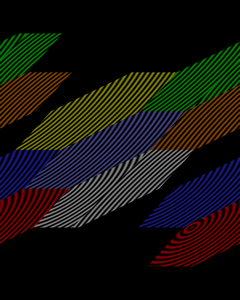
My own interest mathematics has inevitably influenced my pieces. The mathematical ideas behind my pieces have been expressed as “computer code”:
which produced this:
The Technical Challenges
Every artist faces the technical challenges presented by his choice of medium. Painting using a computer is no different. The remainder of this post is given over to describing what is in my experience the foremost of those challenges.
Image Size
If an artist paints on a sheet of paper, the size of the image is fixed. With computers the size of the image can be almost anything. If the intention is to display it only on a computer monitor, then the size can usually be limited to 2000 by 1500 pixels. This number may grow as computer monitors become larger in the future.
If the target is a photographic quality print measuring 8″ by 12″, the size rises to 7200 by 4800 pixels. For an image 48″ by 18″ the size is 28,000 by 10,800 pixels, or over 100 times larger than needed to display on a computer monitor. This presents challenges in how the computer code is designed.
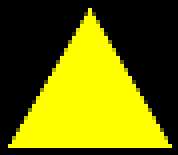
Of Pixels and Equilateral Triangles
It is an uncomfortable fact that almost triangles cannot be accurately represented using conventional computer technology. This applies to equilateral triangles as well:
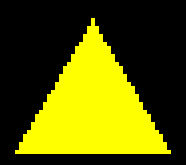 |
The image on the left is displayed in its “natural” units on your monitor. The image of the same triangle on the right has been magnified four times, and you can see how that “perfect” slope of 60 degrees has to stagger its way up the rows of pixels. This issue is more visible with computer monitors than with high quality photographic printers. One way around this is to use anti-aliasing, where immediately adjacent pixels are given some of the colour, but this takes a bit more coding effort:
 |
 |
If you compare the two smaller triangles, the lower one has smoother sloping sides. You can see where some of the yellow has been added to the pixels immediately adjacent to the slope in the larger image.
Keeping Things in Proportion
Still on the theme of triangles, larger triangles can be displayed on a computer monitor without too much distortion, but in the case of smaller triangles, the distortion can be significant. When a larger figure composed of lots of small triangles is displayed, this effect is quite obvious.
Again using an equilateral triangle, the smallest possible representation looks like this:

If you put lots of them together, this is what it looks like:

Looking at it a bit more closely, you can see a lot of holes between the triangles:
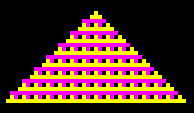
Just to make matters even worse, the result is quite distorted. The image below has an equilateral triangle added to it:

The way around this is to use a large as grid as possible, but not so large as to cause your computer to run out of memory.
Colour Reproduction
Not all computer monitors are created equal. Even the identical monitors can have different colour temperature settings, meaning that the same image looks different on the two different monitors. The issue is even more pronounced when it comes to printers. Most printers in homes and offices have only four colours. Printers in photographic shops typically use seven colours, and give much better colour reproduction as a result. Here is an example of just how differently the same colour in the artist’s mind appears after it as been printed on a home printer:
 |
 |
The image on the left is the “original”, and is probably much the same on your monitor as it was on the artist’s monitor. The image on the right is after it was printed (and scanned). While a home printer is okay for a quick check on how a piece looks, there is no substitute for taking it to a photography shop.
Coding Errors
Coding errors are a fact of life, and can manifest themselves in a whole variety of ways. The program might crash. The result might be completely black, or have the wrong colours, or be distorted.
 |
 |
The image on the left was the artist’s intention. The image on the right is the result of two coding errors. This is perhaps no different to an oil-on-canvas painter accidentally putting his brush in the wrong colour. But as any coder will tell you, once you get the required result the feeling of satisfaction can be immense.
HAPPY CODING! 🙂